I had a CEL due to P0400 - EGR Flow and decided to tackle fixing it myself. the EGR valve is in a pretty much impossible spot on the XL7 -- rear of the engine near the firewall, below/behind the intake manifold and underneath throttle body. I decided the best approach was to remove the rear portion of the intake manifold and bring it up and out with the throttle body and EGR valve still attached. here's a few pics that may help if anyone else has to go through this ordeal...
(Pic 1) rear of engine bay with intake manifold dismantled. in order to pull it you need to detach:
-plastic "V6" cover (4 screws);
-rear IM air passage where it attaches to the center section of the IM (2 nuts & 1 bolt on each end);
-thick wiring harness that runs behind the IM (5 or 6 bolts);
-intake plenum from the front of the TB (1 clamp);
-2 coolant hoses from the sides of the TB and 1 air hose underneath it;
-throttle and cruise-control cables;
-hose leading from back of the IM to the PCV valve;
-various electrical connectors from the TB and top of the IM, as well as the one from the side of the EGR valve;
-EGR pipe that goes from the passenger side exhaust manifold up to the rear of the IM. (has 2 bolts on either end as well as a hidden one on a bracket in the middle just above the tranny.)
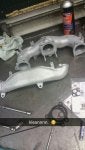
(Pic 2) once you have all of the above undone, this is the section of the IM air passage you remove.
(Pic 3) EGR valve and pipe on the bottom of the air passage.
(Pic 1) rear of engine bay with intake manifold dismantled. in order to pull it you need to detach:
-plastic "V6" cover (4 screws);
-rear IM air passage where it attaches to the center section of the IM (2 nuts & 1 bolt on each end);
-thick wiring harness that runs behind the IM (5 or 6 bolts);
-intake plenum from the front of the TB (1 clamp);
-2 coolant hoses from the sides of the TB and 1 air hose underneath it;
-throttle and cruise-control cables;
-hose leading from back of the IM to the PCV valve;
-various electrical connectors from the TB and top of the IM, as well as the one from the side of the EGR valve;
-EGR pipe that goes from the passenger side exhaust manifold up to the rear of the IM. (has 2 bolts on either end as well as a hidden one on a bracket in the middle just above the tranny.)
(Pic 2) once you have all of the above undone, this is the section of the IM air passage you remove.
(Pic 3) EGR valve and pipe on the bottom of the air passage.